
In the web-based logistics software Logistiqo, price lists for customers are created and managed in the menu under “Settings>Tariff>Tariff”. The function is used to create price lists as matrixes, consisting of graduations in distance and unit of measurement and consequently in price. The price lists can be stored with one or more customers or can generally be selected for a shipment.
To create fixed prices or services, you should generally not use the price lists, but rather services should be created.
1. Structure of the price list
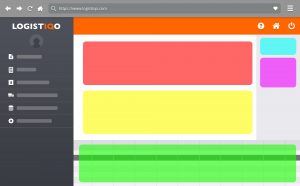
| Green area | In the green area you can see the price lists that you have already created. |
| Blue area | In the blue area you can see all versions of the price list with the validity date. Click on a desired version to open it. By clicking on the “New Version” button, you create a new version. |
| Pink area | The table shows the different zones in the price list (from-to-kilometers or postcode areas). Clicking on a zone opens the price scales for the zones in the yellow area. To create a new zone, click on “New Zone”. |
| Red area | The header of the price list and the basic settings or the basic configuration. |
| Yellow area | Input and defining the zone and the associated tariffs or tiered pricing. |
2. Create a new rate for customers
- In the menu, go to “Settings>Rate>Rate”
- Click “New” in the toolbar.
- The header or description of the new price lists opens:
| Name and Description | Enter the name and description of the price list as free text. |
| Price Divisor and Quantity Divisor | The price divisor and quantity divisor divide the entered price or quantity by the selected value. |
| Default Price Unit | In the “Default Price Unit” field, enter the price unit that should appear in the rows when creating the price tiers so that they do not need to be selected anew each time. |
| Selection Criterion | Select how the price list should be tiered, and with which unit of measure. |
| Manifest Price List | The checkmark next to “Manifest Price List” means that the price list applies to manifests/tours, rather than individual shipments. |
| Override Revenue Account | Check to be able to select a different revenue account template than the default in the “Revenue Account Template” dropdown field. |
| Without Geographical Relation | A checkmark in “Without Geographical Relation” means that no distance tiers (tariff zone or kilometers) are used in the price list, only a performance-based tier. |
| Calculate Distance | The distance is automatically calculated when saving a shipment. This checkmark is mandatory when the price list is tiered by kilometers. Not necessary if the price list is tiered by tariff zones. |
| Subcontractor Price List | The price list is only for determining costs to subcontractors and not for determining the price to customers. |
- In the “Version” line you define the name of the version (e.g. “Version”) and you define the validity date of the version. Within a price list you can have multiple versions with different prices. You can also enter a “min. price” for the price list in the line. If the calculated price is below the minimum price, the minimum price always applies.
- After the basic configuration of the price list has been entered, new zones can now be created and defined. To do this, click on “New Zone” in the table with the zones (pink). The definition of the zone now opens in the yellow area.
- In the “Zone” and “Description” fields, enter a name for the zone and a description.
- Two tables follow. New rows can be added by clicking on the plus sign at the far right of the table:
-
Geographical relation: In this table you specify the geographical data to which the zone and the price tiers should apply. This means you either select from and to rate areas or from and to KM. In the “From rate area” and “To rate area” fields you can select previously defined rate areas or postal code areas or countries. You usually only need one geographical relation for a zone, but it is also possible to specify several relations in the program, e.g. a line with 0 km to 100 km and another with 600 km to 700 km.
- Tarif: The table shows the grading of the unit of measurement and the price grading. The following table provides an explanation of the rate table columns:
-
| Vehicle type | For which vehicle type should the line or price be valid? The default setting here is always “All vehicle types”. |
| Transport type | For which type of transport should the line or price be valid? The transport types are fixed and cannot be changed. |
| Unit | For which unit should the line or price be valid? |
| Unit of measurement (Up to kg, up to LDM, etc.) | The column (up to kg, up to LDM, etc.) that you previously selected in the “Selection criterion” field is always displayed here, see above. Here you specify until when the line or price is valid. |
| Min. Price | If the calculated price is below the minimum price, the minimum price always applies for this line. |
| Flat rate | Flat rate for the line. |
| Single price | Unit price per X (see next line) for the line. |
| Per | Select which unit of measurement the unit price should be multiplied by. |
| Per Stopp | Price per stop in the shipment. |
- Create all price tiers for the zone in the table.
- You can then create the next zone and define the price tiers in the zone, etc.
3. Store rate in rate group
- In the menu go to “Settings>Rate>Rate group”.
- Using the rate groups, several price lists can be combined into a group and the rate group can then be stored with the customer, see below. The advantage of the rate group is that it is easier to process many customers with the same price lists at the same time and, for example, add or remove price lists.
- Select a rate group in the table below or create a new rate group.
- Click the plus sign in the table. A new line appears in which you can select the previously created rate. To add additional price lists to the rate group, click on the plus sign again.
- Save the rate group as soon as you have finished configuring it.
4. Store rate group with customer
- Go to “Contacts>Company” in the menu and select the customer in the table here.
- Check the box “With price list”.
- In the “Rate group” field, select the tariff group.
- Finally, save the customer. The rate group or price list is now stored with the customer and is automatically used for new shipments.